Showing posts with label NYC. Show all posts

Monday, 13 January 2014

Floral ruffian

I have been looking at some fashion pieces to get ideas for my nail art and this dress by Albert Ferretti inspired these off centre ruffian floral nails:
I used Nails Inc Porchester Place for the orange base then painted on the ruffian (tutorial) with Barry M Lychee, sitting it slightly off centre so I had a sweep of colour down the side of the nail. I then used a small nail art brush and Barry M Passionfruit and Key Lime, NYC Blue Sky and Nails Inc Phoenix Place to draw on the flowers. The accent nail is NYC Blue Sky with Digital Nails Ultimate Ginger. 
I love this! I'm making a really effort to come up with some unusual colour combinations and nail art choices and I just love how this came out. The off centre ruffian is very fresh and cool, and incredibly easy to do if you have steady hands. 
For my right hand instead of using a brush to draw the flowers I used my dotting tool to put on splotches of the same colours- it looks exactly the same from a normal distance but you can see the difference here:
If you are not confident using a brush I would just go in with a dotting tool- it's still very effective.  For such a simple design it looks amazing! 

Friday, 10 January 2014

My favourite colour scheme watercolour

When I was looking at my nude nails after my interview and deciding what to paint on top of them I reverted back to one of my favourite colour combinations; grey, blue and yellow. I used the watercolour technique that I learnt from Mr. Candipants (which I used with a different colour combination here.)
 The colours I used here are Barry M Blue Grape, Mavala Berlin and NYC Lexington Yellow, I diluted them with acetone before applying them to my nail then used a brush with some more acetone on it to smudge the edges a little bit more.
This is one of those designs that looks better at arms length rather than the close ups you see on my blog. Still easy instant wow factor if you choose a striking colour scheme and do bold sections of colour.
I am currently deciding what (if any) nail art I want to do over this but trust me it doesn't need it.

Monday, 16 December 2013

My First Snowflakes

I am an avid follower of Mr. Candipants and when I saw her snowflakes design I decided to cut down one of my nail art brushes and try them out and I am so pleased with the results.
The base for this is the amazing Colors by Llarowe Moonshine a deep wine coloured jelly polish with silver micro glitter. This combination of the jelly and glitter makes the polish incredibly sparkly. I painted on the snowflakes in Konad White and paired it with an accent nail of NYC Full Metal Jacket topped with Fandom Cosmetics Rumbelle.
This is a stunning manicure and I am loving wearing it this winter season.

Saturday, 14 December 2013

NYC Full Metal Jacket and Rumbelle

It's fairly rare that I go back to a polish and just wear it on its own after my initial swatch however Fandom Cosmetics Rumbelle is one of the most perfect Christmas glitters I own. I put it over the top of NYC Full Metal Jacket a gold foil polish with two coats shown here.
Rumbelle is a mixture of gold holographic particles, blue hexagonal glitters and small white circular glitters in a  clear base. It looks amazing on gold- a proper festive combination.
I placed quite a lot of the white circles to get an even distribution on the nail but there were no problems getting them out of the bottle at all. This size is perfect for my smaller nail beds as they don't stand away from my nail.
Look at that extra glitteryness, it looks like sparkly snow falling to the ground.

Friday, 13 December 2013

Wassail Nail Art

When I was doing my swatches of the Ethereal Lacquer polishes I couldn't resist adding a little stamping to this beautiful polish. This lightbulb image is from the Bundle Monster Create your own set.
I stamped with NYC Full Metal Jacket my go to gold stamper and love how this turned out :)
Just look at the  sparkle on that- stunning!

Wednesday, 20 November 2013

33DC Black Matte Contrast Nails

The challenge for today is to choose a manicure from your pinterest board and recreate it. I choose this one from Copy That Copy Cat nails. But because my nails are shorter my shiny details are less complex.
I used my Barry M matte polish in Espresso for the base coat and then used NYC Grand Central Station to create the patterns. I much prefer this way of using the contrast between matte and shiny than just doing a french manicure, it gives it a subtle elegance. I'm not sure how long this will last because there's no top coat involved and matte nail polishes are notorious for chipping quickly. Here is Espresso alone at 2 coats:
My computer has done something really weird to the next photo but it made me giggle quite a lot so I thought I'd share it with you.
Remember to check out everyone else's pinterest inspired manis through the inkslinks below :)

Tuesday, 19 November 2013

Autumn spotty nails

I really enjoyed making these nails :) my boyfriend suggested I do some nail art using autumnal colours and I decided to go a little abstract and just do dots in the colours on a nude base.
The colours used here are Barry M Lychee, OPI Every Month is Oktoberfest, OPI A Woman's Prague-ative and NYC Money Never Sleeps. I used two sizes of dotting tool- just pressing a little more lightly if I wanted a smaller dot. I started by adding the large dots to the nail then filling in the spaces around them, ensuring that none of the dots touched each other. 
These nails are very fun and the fairly neutral colour palette makes it classy.
I really like these although I hadn't noticed until I saw these photos that one of my finger nails is longer than the others... I'll have to rectify that! The leaves on the trees outside my window have just started to change and my nails fit in really well :). I just thought I'd share one of my photos from a recent trip to the cambridge botanical garden. If you have a garden near you I highly recommend a trip now as all the leaves are changing and there are some gorgeous colour combinations.

Saturday, 16 November 2013

Blue and Gold Skittle

This is the first skittle mani that I've done for ages! I really wanted to wear OPI Alcatraz Rocks but I have a problem with texture polishes and can only really wear them on one nail without going insane. So I put Alcatraz Rocks on my little fingers and that set my colour scheme (blue and gold) for the rest of the manicure. I used OPI Eurso Euro and NYC Full Metal Jacket for everything else, a striping tape design, tiny polka dots and a stamped nail.
I apologise for the slightly out of focus pictures- the pictures are in focus but I've had to write this post in html because blogger is being weird and it won't focus the pictures for some reason. If you hop over to my Facebook page by clicking the link in the side bar you'll be able to see the pictures in their full focussed glory :)
blue-gold-skittle-nail-art
I love this nail art so much, I really need to take it off and do some more to get ahead for next week but I like it too much...
I made the polka dots with a brush rather than a dotting tool because it makes smaller dots than even my smallest dotting tool.
I've actually painted a set of false nails with the same design as these nails and they will be in my etsy store (Cambridge Nails) sometime next week so if you fancy having this design on your nails for a Christmas party or just every day wear please check it out. I have a few other painted nail sets available as well as my hand painted nail polish jewellery.

Friday, 15 November 2013

33DC Art with your most used colour

The challenge today is to use the colour you have the most of to create some nail art. I have so many blue polishes- I know I have too many but I just cannot stop myself from buying them, I'm addicted! I used three different blue polishes for this; Barry M Blue Grape, My Ten Friends Space Sauce and NYC Aqua Mystic.
There are so many layers to this art but they're not really visible, I started with a base of Blue Grape topped with Space Sauce then stamped over the top with Aqua Mystic and Moyou Suki Collection Plate 09. I just chose some bits off the plate to do each nail but I like the basket weave image on this plate. I'm also super excited to use the koi image.
I then used a medium length striping brush to add in the stripes with Blue Grape. This looked so good in person, Space Sauce gave it a really nice holographic effect and it looked really complex (my boyfriend couldn't immediately work out how I had done it).
I love the complexity and simplicity of this mani :). Tomorrow I have a skittle mani to show you.

Wednesday, 13 November 2013

33DC Geometric

For my geometric nail art I decided to use these parallelogram loose glitters I have to create cubes on my nails. I love how it turned out and can only apologise for the light I had to take this in.
The base for this is NYC A suitcase and a donut, a gorgeous greyish, blackish navy, I am showing you two coats which were just perfect for this polish.
These little glitters are incredibly holographic and I just love this easy cube effect. However, on reflection I wish I'd considered the camera and put my cubes the other way up... here's what they looked like for me :):
There we go, I loved this but I have to admit it only lasted for a couple of hours because I pick glitter off my nails...

Monday, 11 November 2013

33DC Pixellated Gradient

Pixellated nail art is something I first did back in July. I have been seeing it around a lot more recently and thought it would be a great way to incorporate the prompts of three colour gradient with a pattern. I love the colour scheme of blue, grey and yellow that I used for this, they just go together so well. I used a single polish for each and then used white polish to change the saturation but keep it the same hue.
The polishes I used were A England Dorian Gray, Barry M Blue Grape and NYC Lexington Yellow. The yellow was the hardest to get different shade of at the right thickness, hence why there is so much less of it.
I did these nails by using the base I already had on (Nails Inc Covent Garden Ballet), putting OPI Matte Top Coat on and drawing a simple grid using my white Barry M nail art pen (these pens work so much better over a matte base. I then used a small brush to fill in the small squares, mixing a colour and putting it in across all my nails, then mixing the next colour. It took a surprisingly short amount of time to do- in the range of half an hour but I didn't have to paint my base colour on as well.
I love how this looks, it's so simple but really effective. If you're going to use the same effect as me with the lighter squares it's easier to pick a dark colour and lighten it in stages with white polish than it is to try and darken a colour without greying it. Tomorrow will be a small update about some new polishes available in the (UK) shops with a few swatches.

Wednesday, 30 October 2013

33DC Artwork with your favourite brand

I couldn't really pick a favourite brand- for a start I have a load of indie brands I couldn't choose between for my glittery and holographic polishes. So I decided to change this prompt a little bit and I am showing you artwork with my favourite cheap polish brand NYC. NYC is only available at Superdrug, all their polishes are named after New York City and they do a good range of amazing cremes, glitters and foils.
I got Lincoln Center fairly recently from Fragrance Direct and it is an amazing burgundy colour in two coats (on the first coat it does look like blood). The foil effects range has four amazing stamping polishes in it (avoid the orange) and their gold is actually my go to stamping colour and as they're so cheap at £1.50 you don't mind the wastage you get with stamping so much.
I decided to do a tone on tone stamp with these two colours and I hope you like this more subtle look. I got the stamping centre on my nail by rolling the stamper vertically up my nail- looking from the tip towards the cuticle end to make sure it was lined up.

Friday, 25 October 2013

33DC Woodland Animals

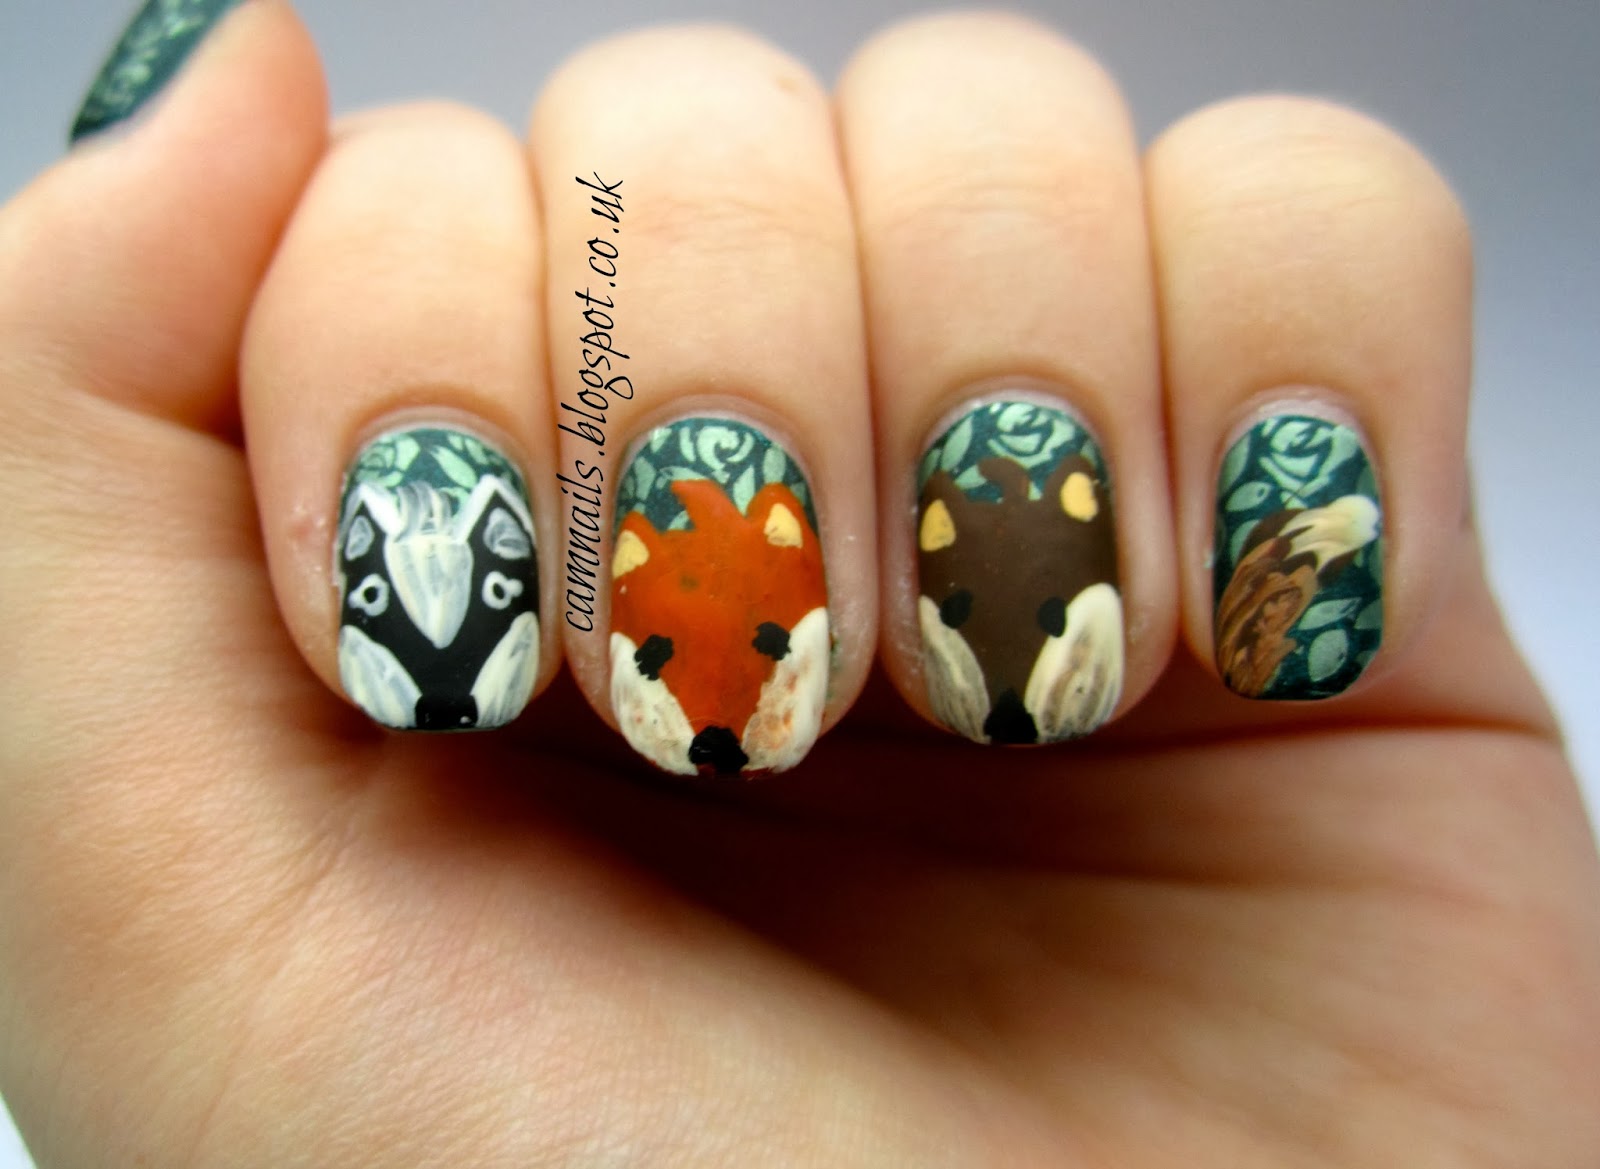
The prompt for today is animals and I had to use this mani from Eeeek! Nail Polish as my idea because it was so gorgeous (much better than mine ;)). We have here a badger, a fox and erm... a dog? My boyfriend thinks it's a squirrel... Plus the tail of the brown creature which was my little addition to this :).
I love this so much- I still need more practice with acrylic paint to make it do what I want it to (my fox was a little lumpy).
For the base I used A England St. George then stamped with Moyou Pro Plate 8 (I think) and NYC Magic Earth to produce a leafy background. The stamping alone looked incredible- I wish I'd taken a picture before I attacked it with acrylic paint. I know it's quite a common thing to do tone on tone stamping but I personally haven't done it before. With my new squishy stamper I am able to do art over stamped backgrounds because I don't have to wait ages for polish to dry before stamping.
I love these little woodland critters :)

Thursday, 24 October 2013

The colour challenged picks my polishes

So I am jumping on the bandwagon of people who have had their significant other choose a few nail polishes for them to do some nail art with and today my lovely Stuart picked out NYC Lexington Yellow, piCture pOlish Orbit, Pocket Money Polish Yellow Submarine and OPI Taylor Blue. While I'm mentioning Taylor Blue Work, Play, Polish posted today that it's going to be sold again in November so check out the link to her blog to read about that.
I really don't use ruffian nail art enough, it's really suited to the round shape that my cuticles have. I loved the look here before I added Orbit although I do like the dark contrast on the tips.
I thought I would talk you through my thought process here: I knew that the yellow would have to go on first because it is definitely a two coater and I would struggle to get it opaque over either of the blues. I then thought it would be really cool to have a bright pop of colour be painting on the OPI as a ruffian and then putting the PMP over the top tying those colours together. I meant to use Orbit to do the ruffian on my accent nail but totally forgot so the only way I could think of to include it without throwing the whole mani off was to paint on a thin tip with it but it's quite thick and difficult to manipulate.
Not too bad really :), at one point he had both of the blues and an orange very sheer jelly polish and I was worried. I had fun doing this and it was really interesting to see what my boyfriend pulled out of my collection.

Monday, 21 October 2013

33DC: Chinese Pandas

This is possibly one of the most stereotypical things you could think of when it comes to China and I don't even want to guess how many people will do pandas. However I couldn't resist the opportunity to do some subtle stamped bamboo and then stamp pandas over the top.
The base for this is Ethereal Lacquer Thigh Highs which I showed you yesterday. I stamped using 2 True Arete, NYC Full Metal Jacket and Konad Black. During this I managed to knock my konad black off the table and spill it onto my clothes! Ah the casualties of nail art.
I love my little pandas sitting there munching on bamboo.
Ok so I could have done something a little bit more original but I love this and it's a very neutral direction (as opposed to the red and gold dragon I was also considering). Tomorrow's post also features a new indie polish that I love so come back to see how I wore that one :).

Monday, 14 October 2013

33DC Flowers: Moyou Tulip Stamping

As soon as I saw this Moyou stamping plate image I knew what I wanted to do with it and that was to make stamper decals:
These are quite simple to make- pick up your image on your stamper as per usual and while it's on the stamper use nail polish to colour in the parts of the design you want to (here I coloured in the tulips and the grass below them)  then add a generous coat of clear nail polish to the image and wait for it to dry (I usually leave mine about 15-20 minutes) then use tweezers to peel the whole thing off the stamper, place it on your (dry!) base coloured nails, use nail scissors to cut away any excess around your nails and then put another coat of the same clear top coat over the top, wrapping the tips.
I used a few different polshes here, the background is Jessica Lime Cooler, the flowers are H&M Orange and Yellow, OPI Flashbulb Fuchsia and A England Rose Bower, and the leaves are NYC High Line Green.
I love the effect you can get with stamped decals, they can produce some exceptional nail art images. Remember to check out all the other 33 day challenge flower designs, there will be some amazing nail art!

Saturday, 12 October 2013

Up! Nail Art with Indy's Indies

A new UK indie polish maker has popped up :). Indy's Indies first collection was inspired by disney films and a couple of autumn themed polishes. The one which caught my eye was the totally unique glitter topper Balloon House, inspired by the movie Up! This is a clear based polish with small circle glitters in a variety of matte colours. Rather than just doing a swatch of the polish I decided to do some nail art representing my favourite thing about the movie (other than the touching sequence where you are introduced to Ellie) Kevin!
Up!-nail-art-balloon-house-kevin-indy's-indies-polish-manicure
My index and little fingers are single coats of Balloon House so you can see what it looks like alone (with added balloon tails). For my ring finger I hand placed glitter into the bunch to get the clustered effect. I then used my nail art pen to draw on the strings and the outline of Kevin on my middle finger before filling in the colours. The bubbles were my fault because I underestimated how thick the polish was and didn't leave enough time to dry between coats.
Up!-nail-art-balloon-house-kevin-indy's-indies-polish-manicure
The colours used were: Essie Rock the Boat, Barry M Black nail art pen, Indy's Indies Balloon House, OPI Tomorrow Never Dies and Hi Pumpkin, NYC Lexington Yellow, Digital Nails Convergent, Elegant Touch White.
Up!-nail-art-balloon-house-kevin-indy's-indies-polish-manicure
I love how this turned out and it got a few compliments as well :). I'm excited to see what else Danielle is coming up with and I hope there are some more gems like this in her future collections.