

Showing posts with label Purple. Show all posts
Showing posts with label Purple. Show all posts
Saturday, 11 January 2014
Sinful Colours Let's Talk
The second Sinful Colours polish that I picked up is Let's Talk, a gorgeous purple polish which almost has an inner glow. My camera did not like the colour of this polish and was picking up a totally different colour so I changed the settings to get a more realistic interpretation of the colour, which means that I have very yellow skin in the photo.
It is just beautiful- and I don't really wear purple polish so that's saying something. This is two coats. Again, find a Sinful Colours stand and see if there are any that catch your attention- you can get 6 of these for the price of one OPI polish (Uk prices) and by my experience you won't be disappointed. On Monday I'll have some gorgeous thermal polish nail art to show you.

Saturday, 4 January 2014
Purple Holographic Waterfall
I recently picked up Barry M Blueberry and Prickly Pear as they are the perfect creamy ice cream colours for my spring palette (unfortunately minty green doesn't suit my skin tone so you won't be seeing much of that). I first decided to gradient them but should have put a coat of white then gradiented over that, as over the blue the purple came too close and the gradient did not show up on camera so I did a waterfall mani instead:


 I experienced terrible tip wear with this, overnight all of the tips were showing and I'll have to change it today. This may be because there were a few layers to this and because I forgot to wrap my tips although I would still expect better than one day wear without wrapped tips.
 Waterfall is a really cool technique that was first thought up by Sammy over at The Nailasaurus and she has a tutorial on how to achieve it. It is pretty easy and looks great :)

This mani did not want to photograph either! I have several very blurry shots and a few not quite so blurry photos.

I only used holo polishes for the waterfall in shade of grey, blue and purple I got this photo on my iPhone showing the effect this has.

Monday, 2 December 2013
Smitten Polish Imperio
I recently got hold of Smitten Polish Imperio and I love the purple holographic ness of it. I am going to show you two coats because it was definitely opaque here. With this on every movement of your fingers makes them sparkle up at you.
 Although this polish looks amazing on it was a little tricky to apply, coming out in very thick coats. If you get a bottle work patiently with it and leave it a while between coats to prevent dragging. It dries to a satin finish so I would definitely recommend using a glossy top coat to bring out the best in this polish.
 Tomorrow I'll show you the nail art I did on top of this :)


Tuesday, 26 November 2013
Nail Lacquer UK Queen B Swatch and Review
What a long title! Today I have one of Nail Lacquer UK's polishes to show you. Last week she released a few collections all at once but the one that drew my eye was the Royals collection featuring glitter mixes with gold leaf. However, AJ only released one bottle of each and by the time I got there there was only Queen B left (please make more AJ- I will buy a bottle of all of the other 3 if you do!). Also if you haven't noticed the blog has had a Christmassy facelift :)- I love it, please let me know what you think to it by leaving me a comment.
 The gold leaf in this polish is just the right size and mixes perfectly with the glitters. The glitter payoff is also excellent with this being one carefully applied coat.
 I decided to pair this with OPI Houston We Have A Polish a three coater purple jelly, this is actually the only polish I own that's anything like this berry colour and I really like it. I had to include the next photo even though it is a little blurry to show you the glitter that you get off this polish- just look at the index finger, stunning!
 And because I can't leave you with a blurred photo- one more :)
 I love this polish and am so glad I managed to grab a bottle, if AJ makes any more I'll fight you for them ladies ;)


Thursday, 31 October 2013
Hidden Eye Nail Art with Crows Toes One Trick Pony
Everyone and his dog has done this nail art but I really like it and thought it would work very well on the base of Crows Toes One Trick Pony.
 One Trick Pony is a purple-teal colour changing holo. Battling the english weather I managed to get a little of the holo to show in the above photo but under artificial light this one really sparkles. It applied very easily and this is three coats although two would probably have been sufficient if you're not taking macro photos.
 I drew on the black spaces with my Barry M nail art pen. These dry really fast so I didn't have to wait long before I could draw on the eyes with my white nail art pen. I made them all look in different directions and I do think my hidden monsters in the dark look a little afraid themselves.
 I loved this, I wore it for three days with no tip wear and I didn't stop liking it, I was very sad to eventually have to take it off. Happy Halloween!


Sunday, 27 October 2013
Textured bats
I am finally getting into the swing of things for halloween- it's not such a big deal here as it is in the States but I am still going to a party dressed as a sugar skull. Anyway I got a sudden desire to paint bats on my nails and I did it with one of my textured polishes- Barry M Countess.
 The base for this is a matte ruffian of Barry M Mango and Vivid Purple.
 I just painted on the bats with a small nail art brush and I'm really pleased with how they came out :)


Tuesday, 22 October 2013
Crows Toes Tiki Torch Swatch and Nail Art
When the latest Crows Toes collection came out there were a few I fancied (One Trick Pony, Storms Never Last, Boat Drinks) but the only one I had to have come hell or high water was Tiki Torch. Tiki Torch is a purple jelly with tiny glitters which flash up holographic in the colours of fire.
 I mean who could look at that and not be enchanted! It looks very much like you have the embers of a fire on your nails. I didn't want to cover up much of the base with nail art so I decided to apply some rose water decals I was sent along with some indie nail polish.
 These decals were very easy to use and look very effective considering how little effort they take to apply. I did all of my nails on both hands and had matching nail art for a few days which was really nice :).
 Also the pictures were actually taken on the third day of wear with no visible tip damage which is impressive for me as I'm quite hard on my nails.
 I love Tiki Torch so much and I'm really glad I managed to get hold of it.


Tuesday, 8 October 2013
Celtic Heart Knots
When I got my Bundle Monster 2013 Blogger Collection Plates I was really drawn to this full nail image of heart shaped celtic knots. I decided to stamp it over a gradient of A England polishes Ascalon, Lady of the Lake and Tristam. I think I've said before that the A England polishes gradient out really nicely and work together really well in most combinations. If you follow me on facebook or twitter you've probably seen this image already- I got a little arty with my shiny new plates. I have other pictures of this manicure but none that I like so much so I'm only going to show you this one plus some pictures of what I've been working on in my spare time.
 Polish jewellery! I made this galaxy themed ring for a friends birthday (you are also getting a slightly blurry sneak peek at Thursday's nail art).
 It was a bit tricky to figure out how to do a galaxy backwards but I managed it :).
 So there we have my ventures into nail polish jewellery. I'll keep you updated with any other designs I make.


Friday, 4 October 2013
33DC Textured Gradient
I showed you Barry M Countess alone yesterday and for today I sponged another textured polish, OPI Alcatraz Rocks, over the tips of my nails then added studs from the Born Pretty Store which came in a wheel with a few different types of stud.
 To apply the studs without changing the texture of the polish I used dotting tools to add a dot of clear polish where I wanted the stud then used the dotting tool while slightly tacky to pick up and place the studs. The studs are thin and lie close to the surface of my nails which I really like.
 I've gone for some more arty shots that I normally do, I love the one below and the one above shows you just how thin these studs are.
 I hope you like this :), tomorrow I'm going to be showing you a design I made with the awesome new bundle monster collection.


Thursday, 3 October 2013
Barry M Countess
I don't normally do standalone swatches but my nails need a break after the 31 day challenge so I'm going to show you Barry M Countess alone today then the nail art I did with it tomorrow.
 This polish is simply gorgeous, a deep aubergine colour with holographic glitter in every colour.
 You are not supposed to top coat texture and I didn't want to cover it up for tomorrow's design so I've left it as is.
 Make sure you enter my giveaway :)


Sunday, 8 September 2013
31DC Metallic Nails
I was a little stuck for things to do for metallic nails so I pulled out one of my untried glitters. This is Pocket Money Polishes Heart of Glass which has shards of pink and silver glitter in it. I decided to pair this with another one of my untrieds- Crows Toes Minion and some heart nail art. I am absolutely in love with this nail art.
 I started with a base of Crows Toes Minion, which is epic by the way! It's a purple to deep teal shifting duochrome with flakies in it. This is two coats:
 I then used the polish brush of A England Rose Bower to create two intersecting curves on the nail then did the same slightly further up with Nails Inc Motcomb Street before sponging on Pocket Money Polishes Heart of Glass.

 I love that the red frames the top of the heart, Rose Bower is the perfect colour, opaque in a single coat and with a slight holographic flash. Heart of Glass is amazing, the shards are flat on the nail and big enough for it to be obvious that the glitter pieces are irregular. Let me know if you like this as much as I do :). For a bit of whimsy here's a tower I made with all of my Pocket Money Polishes
 Tomorrow is Rainbow themed :)


Friday, 6 September 2013
31DC: Purple End of Summer Lavender Nail Art
When I think about the end of summer I think of the smell of lavender. In Cambridge at the moment all of the lavender is out and I love it, the smell and the look. Nail lacquer UK currently has a competition running where the theme is "the end of summer" so I thought I'd paint lavender on my nails. This also fits with the purple themed of the 31 day challenge.
 The base for this manicure is Essie Rock the Boat and then I used Cirque Erda and A England Lady of the Lake.
 I then decided to matte top coat the manicure to make it more interesting- sometimes the matte just makes manicures look complete and I think that is the case here.
 Back to normal non- rotated pictures, I only thought that I should have done these the other way up for the sake of photos after I had done them...
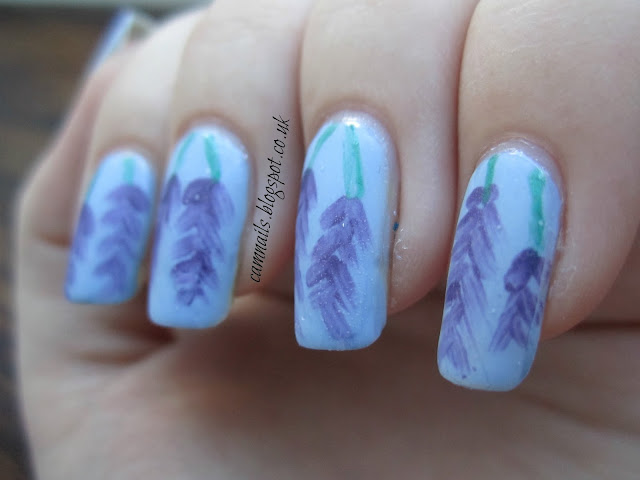 I really really like this nail art and I hope you do too :). You may have noticed a new tab pop up in my pages this is where I will be summing up my 31 day challenge posts as I continue through the challenge so feel free to go have a look and see all of my challenge manis in one place :).


Tuesday, 20 August 2013
Smitten polishes
Today I have two Smitten Polishes to show you, both from the collection inspired by the musical Wicked!
 This is one coat of Look to the Western Sky, over a coat of Nails Inc Lowndes Court. I think it could have been built to opacity but I like to be able to control how much glitter goes on my nails without worrying about whether the polish is opaque or level.
 This polish reminds me of a beautiful sunset.
 And moving on to the second polish, I Feel... Wicked:
 This is the most amazing polish ever! It is buildable but I prefer to layer so I am showing you two coats over Barry M Racing Green. Application was easy and I cannot stop staring at my nails.
 I used two coats of Save the Nail Fast Dry top coat to smooth this out, but I could have got away with one.
 Smitten Polish has surpassed my expectations, I love both of these polishes and would definitely buy another Smitten.


Monday, 19 August 2013
Nail Inc Swatches
I have three gorgeous Nails Inc polishes to share with you today:
Nails Inc Blenheim Terrace
This is a beautiful blush coloured polish with a shimmer running throughout. Opaque in two medium coats, application was a bit tricky but didn't take over long to correct.
 I am undecided over whether this suits my skin tone or not.

Nails Inc Horse Guards Parade
This is a rose gold wonder, it has a pinky gold reflective metallic finish. It looks very classy on and I can imagine it working with all skintones. The first photo is in full sunlight to show just how shiny this is.
 Because this a shimmer not a glitter it comes off very easily. I have previously used this in some nail art here. but it was quite hidden in that design so here it is in all its glory. The next photo is in shade to show off the rosy glow of the polish.
 Nails Inc Lowndes Court
This polish is fantastic! This is one coat which applied really smoothly and was incredibly opaque.
 This polish is the definition of a blurple, walking the line between blue and purple.

Nails Inc Blenheim Terrace
This is a beautiful blush coloured polish with a shimmer running throughout. Opaque in two medium coats, application was a bit tricky but didn't take over long to correct.


This is a rose gold wonder, it has a pinky gold reflective metallic finish. It looks very classy on and I can imagine it working with all skintones. The first photo is in full sunlight to show just how shiny this is.


This polish is fantastic! This is one coat which applied really smoothly and was incredibly opaque.


I apologise for the varying nail lengths in this post, these swatches were done over a couple of months.
Subscribe to:
Posts (Atom)